If you are a recipe and cook book hoarder like I am you have torn out recipes in piles, folders, boxes or strewn about on counter tops, in files, and tucked into the magazines they were extracted from. Actually, I'm not that bad. I do have all of my tear outs and newspaper clipped recipes in a pile in my cook book cupboard. Do I EVER make any of them. Ah, no. And why not? Because I won't ever go through the pile to find that recipe that I ripped out months ago. Who has time for that? But, I tear out some really yummy looking dishes and hope to make them "Someday". That's the 8th day of the week - "Someday" - the one that never comes. Long ago, when I had time,(BHAK(before husband and kids)) I would actually cut out the recipe and glue them on paper and tuck them in a binder. I have three of those binders and I use them often. Well, I just don't have time for that anymore so I tried to come up with a way to streamline that idea so that I could use those recipes without investing a lot of time finding them. It's not perfect and it's not really pretty, but for me, at this point in my life, it is functional. That's as far as we can go sometimes, isn't it?
Here is your first step to using all of those recipes. This week, I want you to accomplish three tasks. The first step is to collect the clippings and put them all in one place.
The second step is going to involve a hole punch - preferably a three hole punch. It will make your life much easier. Now, three hole punch your stash of recipes. Actually, you would be surprised at how quickly this will be accomplished with a three hole punch. If need be, take five minutes, here and five minutes there to get this done. Do it when you are waiting for the onions and peppers to fry or the toast to pop.
Step three will help you with dinner this week. During hole punching sessions, pull out a few recipes that you can make for dinner this week. Now, put all of the recipes back in your pile, file or bag and sit tight 'till next week. Enjoy those that you pulled out for dinner. If you liked them, note that on the recipe and put that on the top of your pile. If you didn't, pitch it.
That's it for now. If you don't have time to punch, just collect and stack this week. Next week we'll put them somewhere.
For next week: You will need a binder or two, depending on the height of your recipe stack.

A passionate place of crafting, great food, craft book reviews and the joys of country living.
Monday, February 27, 2012
Saturday, February 25, 2012
200 Creative Crafts For You & Your Home - Time for another book review...
I buy books that inspire me. It is very rare that I actually use a pattern straight from a book. I swoon over the pictures, log the basic idea in my mental file and learn new techniques that I can apply to my own creations. Some of my favorite books are older publications that have some great basic retro-type ideas.
This book, "200 Creative Crafts for You & Your Home" is packed with exactly what it says, 200 pieces of inspiration. Most of these ideas are simple and fast to create.
 There are two sections to this publication. The first section, crafts for you, contains more personal craft projects like jewelry, bags and accessories.

 The second half of the book has projects for your home including frames, vases, teaspoon coat hooks and furniture. There are 312 pages of goodness here.

 There are so many ideas I have tagged in this book I'll never have the time to make them all, but if you are looking for a quick project-some of which can be kid/teen friendly, give this publication a looksy. Take the basic idea and embellish to your heart's content. Out of 200 ideas you are bound to find more than a few that pique your interest.
This book, "200 Creative Crafts for You & Your Home" is packed with exactly what it says, 200 pieces of inspiration. Most of these ideas are simple and fast to create.


Winter Outside Spring Inside
We finally got a snowstorm here in Michigan-our first this year! There was plenty of hype and hoopla from the news teams about the huge winter storm with 6" - 8" sure to pack a punch right in our backyard. I made plans to go sledding with the kiddos in the morning as we were sure to have a much needed snow day. Yahoo! We woke to 1", school as usual, no flakes falling but a promise of more snow to come throughout the day. We ended up with five inches, maybe. Some big snowstorm!
But indoors we have been enjoying a bit of spring, courtesy of my Farmgirl friend, Pat. I received her gift of two bulbs at Christmastime and look what they have grown into. Lovely!
 Notice the stowaway? Inside my house. In february. It's one of those cabbage butterflies-or moths, I think. I don't know where it came from. Probably in my closet, eating my wool sweaters! She was fluttering around my kitchen lights so I invited her onto my finger, ferried her over to the blooms and gently placed her right on top. She seemed delighted to be there as her proboscis dipped in and out of the blossoms.
 Perhaps it was just her time to go or maybe the nectar was poisonous to her but two days later she was lifeless on my windowsill. Poor little thing. It was an amazing breath of springtime in our little corner of the dining room.

But indoors we have been enjoying a bit of spring, courtesy of my Farmgirl friend, Pat. I received her gift of two bulbs at Christmastime and look what they have grown into. Lovely!


Thursday, February 16, 2012
Valentine's Day Silverware Cozies

Saturday, February 11, 2012
REMEMBER TO LUBE YOUR ROO!

Wednesday, February 8, 2012
TODAY'S CRAFT BOOK REVIEW: fabric leftovers BY D'ARCY-JEAN MILNE

Today, I'm going to review a fun publication by D'Arcy-Jean Milne called "fabric leftovers - Simple, adaptable ways to use up scraps". And do we all have a mountain of scraps that we can't bear to part with? Crafters tend to be a frugal lot and we are certain that we can put each and every one of our little scraps to good use. This book will help you to do just that. Even the smallest scrap can be incorporated into awesome little works of art. One of the projects that really drew me to this book are the colorful embellished little fabric beads. It's a quickie craft and one that is very portable.


The beginning of the book focuses on sorting fabric, colors, threads, processing and decorative stitches. The base of several of the projects is "lazy crazy patchwork"-alias sewing your scraps together.


From there you can construct many of the projects in the book such as these boxes and frames.


Give this little gem a look-see. I think you'll find new life for your treasured fabric scraps.
Sunday, February 5, 2012
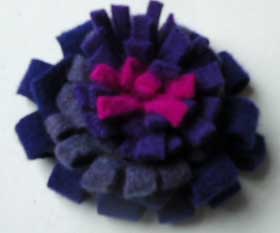
Too Simple Felted Flower Brooch

This quickie little brooch is simply too easy! I love these because you can choose any combination of felted sweaters and each brooch comes out with its own character and design.
What you'll need: felted sweaters, glue gun, pin back, scissors.
Lets get started. First you will need an array of felted sweaters of your choice. I chose 4 in the purple(ish)family.


Next, snip the first two strips about every 1/2 inch, the whole length of the strip. Be careful not to snip all the way through or you'll end up with two pieces.
The next piece you will cut differently. Fold one of those wider strips in half. Now you will snip this from the folded end. I snipped a little wider than 1/2 inch. Do the same with the last strip. They will look like this.


Choose one of the first strips you cut to use as your center. I chose the hot pink. Simply roll the uncut edge on itself and secure with a few dabs of glue as you go. It will look like this.

Next, add your second strip by rolling it around your center. Again, glue as you go. See, how it starts to take shape.

Next, grab one of your folded/snipped pieces, fold in half like the above photo, so that it fans out. Roll this strip around your first two. Now, you have three different layers.

Next, Add your fourth strip by rolling around your budding bloom, again secure with glue as you roll.
What I love about this, beside the fact(s) that it is ridiculously easy and doesn't have to be cut perfectly, it is so versatile. You can use any combo of colors, thicknesses of strips, width of snips or combo of folded or non folded strips and they all come out beautiful.
Stay tuned for more variations on these lovely brooches.
Friday, February 3, 2012
Blog Under Construction
I decided that I didn't like the way I had set up this blog-so before I posted anymore I thought I had better change it before I lost anything. Bear with me. For those of us who are techie challenged the whole thing is a learning curve. I went back to a Blogger template and really like the way you can change it up with different fonts, colors and backgrounds. I settled on a white background and wide template. It just seemed less busy to me- and just like me, I like clean wide open spaces! I will be adding and deleting widgets and hope to have it all in place this weekend. That way, I can just go gangbusters and post some great content and not have to deal with the set up ANYMORE-until I'm ready to change it...again.
Subscribe to:
Posts (Atom)