Showing posts with label crafts. Show all posts

Tuesday, February 18, 2014

New Stitchery Patterns

All of this frigid and snowy weather has led to plenty of designing this year.  I have several new designs that are photographed, written up and ready to be put together in a PDF format.  Here's a little preview.


Monday, February 17, 2014

Book Review -" Put Your Stamp On It"

Time for a craft book review.  This week I have chosen "Put Your Stamp On It, stationery, aprons, totes, and more", by Meagan Lewis.  This is not the usual "how to use rubber stamps" book.  Meagan has 20 great projects plus instructions for making your own hand carved stamps.  Stamping isn't just for stationery and cards anymore.  In this book, there are a number of out of the ordinary projects.


As you can see on the cover, there are some paper projects like this pretty card.


And this monogram stationery.


And these pretty lined envelopes.


But there are also instructions for home dec items like this jewelry organizer.  Plus there's a lamp shade and storage organizers, too.


I like to stamp on fabric more often than not.  Mostly, I'm working on fabric journals.  Meagan has several fabric stamping projects like an apron, tote bags, scarf and this nifty hair bow.


And this bright, sunny pillowcase.

There are plenty on instructions on carving, color combining, using stamping supplies and caring for your supplies.  This book is definitely worth a  second look.  I purchased it not necessarily for the projects shown but for the techniques it teaches me.  Check it out.

Saturday, February 8, 2014

I Just Don't Get Facebook

So I never wanted to get on Facebook.  As a busy mom and designer - and chef and maid and farmer and gardener and sub teacher and chicken whisperer and goat herder and laundress and friend and wife (need I say more) I just don't have time to get tangled up with long lost friends from High School.  I hear my pals talk about their time on Facebook and I just don't want to go there.  But I am trying to put together a Facebook Fan page for my business "The Stitchin' Coop" where I sell PDF patterns.  But quite frankly, I just don't get it.  I'm trying to figure out how to post the right pictures and write great information.  But really I don't get the appeal of Facebook, the way it's set up I mean.  It doesn't seem user friendly somehow.  Maybe it's the tech challenged part of me talkin' but  it could have been designed with more pizzaz, I think.  Better layout, different design, maybe more blog-like.  What do you think?  Are you  on Facebook?  What do you think about the way it's designed?

Wednesday, July 31, 2013

Cowboy Boot Birdhouse

I entered many things in the fair this year, this birdhouse being one of them. I think it turned out pretty cute. And it was the first place, blue ribbon winner! Ok, so it was the ONLY birdhouse entered this year so I won by default- but I still think it turned out great.
Unfortunately, I did not get to keep it after the fair, although I knew this going in. All birdhouses were going to be kept and auctioned in February for our fair fundraiser. That's fine with me. I hope they raise enough to be able to buy a fair trophy for one of the kids next summer. I was disappointed though, that no one else entered a birdhouse. I always love to see other artist's creations. Let's make it. You will need: a cowboy boot-I found mine at a garage sale license plate bandana wire belt small grapevine wreath drill with bits to drill through metal plus one of those circle grindy things with the teeth little stick for a perch small piece of wire fencing-optional glue Ok, here we go. We had some fencing left over from a goat pen project. The holes in the fence were about 2 x 4. I rolled up a piece,about 12 x 6, tube fashion, tucked it inside the boot, just to support the inside of the boot so it wouldn't collapse or crush. You couldn't use anything with small holes as your birds wouldn't be able to get into the house. Like I said, it's not necessary but we had the fencing so I used it. You will have to cut your piece to fit inside your boot. Using your drill and big circle grindy thing(is it used to cut holes in doors for a door knob?) cut an entry circle in the side of your boot so your birds can get in. You can also use an exacto or craft knife. Using a smaller drill bit, drill a small hole under that to accomodate a perch. Now switch to a metal bit to put holes in your license plate. Bend your plate in half to form a roof. Set it on top of the boot and decide where you will be able to attach the plate to the boot. Drill one or two holes on each side of your plate with matching holes at the top of the boot. You will be wiring the plate on via these holes. Cut 2-4 lengths of wire-depending on the number of holes you drilled- 5"-6", long enough to fit through the boot and the license plate. Wire the plate to the boot. My boot had loops at the top so I cut a length of wire and wired it onto the loops for a hanger. I cut a 12" piece, attached it to the loop on one side, ran it over the top of the plate, and attached the other end to the loop on the other side. Add the perch by making sure your little stick fits snugly in the perch hole. Add a dab of glue to hold in place. So that's your basic boot. Now it's time to embellish it.
I had an old thin belt with a western style buckle that I wrapped twice around the bottom 1/3 of the boot. Then I rolled up and tied on a bandana, leaving the corner down, bandit style, for some color and flair. I had seen some boots on the internet with bandanas just rolled and tied on but I liked leaving a little corner. I got it to this point but felt like it needed some thing more. I headed to the Salvation Army and found just the right size grapevine wreath to put around the hole. I glued this on. Hmmm, what else? A sheriff's badge was exactly what it needed! So off to the dollar store I went. Sure enough, in the kids isle I found a package of gold badges, a sheriffs star being one of the them. Perfect! It was just the bling I was looking for. Just a dab of glue to hold this in place and YEEHAW! You done got yourself and fine birdhouse, pardner! This is a great birdhouse for the cowboy or cowgirl in your life. It's easy to make and a sturdy home for your backyard birdies. If you make one please share it with me.

Wednesday, April 24, 2013

The Day Has Finally Arrived!

Yes, the day is finally here.  I have been a crafter and stitcher forever!  When my children were young I started drawing stitchery designs by the dozens.  I have two filled notebooks of doodles and patterns ready to be stitched up.  Back when the kids were younger I actually stitched up a few of them then tucked them away until "someday" came and I would have more time to write up the instructions, supply list etc. etc.  If you are anything like me, you put everyone's needs, the housework, cooking, critters and yard work before anything else.  I have had this dream in my heart for so long, 15 years has gone by, the kids are a little older and guess what.  I have put some of those other household chores on hold to wrap up and publish my patterns.  I have over 30 designs with 6 of them listed so far on ETSY and Pattern Mart.  Yea!


I have many holiday designs, whimsical flowers, cute critters and samplers.

This was one of those things that I just HAD to do before the end of my life(which is hopefully a long way away).  I would have had so many regrets had I not taken the time to do this. My hope is that these stitcheries bring simple joy to both the stitcher and the recipient.  Now that I'm on my way, stay tuned for some free stitchery patterns right here.
We have baby chicks right now.  Wait 'till you see them...

Tuesday, April 24, 2012

Intentions For This Blog

Craft sharing was my primary intention for this blog with a little sprinkling of food/family/country living.    I love all things crafty.  I have etsy shops, do craft shows every fall and crafting is always, always, always intermingled in my everyday thoughts.  It's simply a part of my soul.  However, time is short in my life right now.  Cancer is currently part of my family and I spend as much time as possible with this person...on top of caring for my own three children and husband.  I simply do not have time to do any extensive crafting.  What I am working on are stitchery patterns because I can fling the needle around while I'm visiting.  If I can figure out how to, I will start at least sharing some free patterns. In the meantime, writing is sporadic at best.  Life simply gets in the way sometimes.  But life is rarely simple, is it?

Thursday, February 16, 2012

Valentine's Day Silverware Cozies

Whip these little silverware cozies up in a flash, no pattern necessary.  To make these heart cozies, I simply doubled my felt, folded it in half and cut out a half heart.  You know how to do that.  I stitched an easy design and there you have a bright addition to your Valentine table.  Don't just save them for Valentine's day though.  Use them often to show your loved ones that you care.  You can even tuck a napkin in behind.

Sunday, February 5, 2012

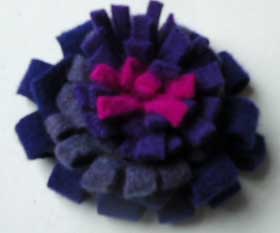
Too Simple Felted Flower Brooch


This quickie little brooch is simply too easy!  I love these because you can choose any combination of felted sweaters and each brooch comes out with its own character and design.  
What you'll need: felted sweaters, glue gun, pin back, scissors.
Lets get started.  First you will need an array of felted sweaters of your choice.  I chose 4 in the purple(ish)family.
Next, from each sweater(I cut from the sleeves) I cut one  strip, 5 to 8 inches long.  The two inner colors were about 1/2 wide, the two outer strips were about 1 1/2 wide.
They do not have to be perfect.  
Next, snip the first two strips about every 1/2 inch, the whole length of the strip.  Be careful not to snip all the way through or you'll end up with two pieces.
The next piece you will cut differently.  Fold one of those wider strips in half.  Now you will snip this from the folded end.  I snipped a little wider than 1/2 inch.  Do the same with the last strip.  They will look like this.
Rev up the glue gun and let's put it all together.
Choose one of the first strips you cut to use as your center. I chose the hot pink.  Simply roll the uncut edge on itself and secure with a few dabs of glue as you go. It will look like this.

Next, add your second strip by rolling  it around your center.  Again, glue as you go.  See, how it starts to take shape.

Next, grab one of your folded/snipped pieces, fold in half like the above photo, so that it fans out.  Roll this strip around your first two.  Now, you have three different layers.

Next, Add your fourth strip by rolling around your budding bloom, again secure with glue as you roll.
Now you need a pinback.  I just eyeballed the size of the back of the flower and cut a felted piece to cover the back. Putting glue over the entire layered back helps to secure it all and give it a bit of stiffness .   Add your pin and you are finished.
What I love about this, beside the fact(s) that it is ridiculously  easy and doesn't have to be cut perfectly, it is so versatile.  You can use any combo of colors, thicknesses of strips, width of snips or combo of folded or non folded strips  and they all come out beautiful.  
Stay tuned for more variations on these lovely brooches.

Tuesday, January 24, 2012

American Sewing Expo


>


I attended the American Sewing Expo in Novi, Michigan again this year.
and had a crazy fun time.  There are numerous classes and workshops that you can take, plus there are rows of vendors with all kinds of sewing and crafty goods that beckons you.   After being home with said boy, I felt I finally had the freedom to check out the Expo again.  Crafting and sewing changed quite a bit over those 7 or so years since I was away.  There was not as many "craft" workshops and vendors selling "craft" patterns.  Patterns have become more utilitarian and clothing oriented.  There are more garment sewing classes and fewer classes on how to make stuffed snowmen.  I'm not a garment sewer but more of a crafter so my view  on the Expo has changed a bit. Nevertheless, I still managed to find three make-and-take workshops I couldn't live without and I spent more than a couple of bucks at vendor booths!  It's not just classes and vendors that  suck me in though, it's the free demos on sewing gadgets, all of the sewing machine companies are present and there are pile of fabrics, notions and books begging to be purchased.  It's simply sewers heaven!
   Some of my favorite vendors included those that sold beads, silk flowers, fiber artists and smocking. Check out the zipper flowers that were made by those of us who attended the class.


3232.jpg" width="320" />And, of course, you can't forget the amazing quilts!